
Lately, I have been taking a lot of photos of food while I travel. San Sebastian’s Food Week in Spain was amazing and I couldn’t help but document it for my readers at Travel Destination Bucket List. (Restaurants and cooking school links: San Sebastian Food, La Muralla, Ni Neu, La Fabrica)

While I revelled in the foods and flavours, I quickly learned how hard it is to do food photography. Low lights in restaurants and lack of tripod meant that a number of shots were not as I envisioned! It got me thinking – surely a google search on food photography will yield some answers. It certainly did – 479,000,000 hits. I narrowed it down to food photography tips – a mere 119,000,000 hits! Digital Photography School was the first to come up. As a fan of their site, theirs was the first I clicked!
I realized quickly, for my purposes anyway, there are 2 schools of food photography that are of interest to me:
1. Food photography in restaurants. While I love food, cooking and eating, travel is my passion. I hope to share many restaurant reviews from all around the world. I need to improve my skills if I am to share my finds. (Travel Destination Bucket List has a food category for delectable dishes from around the world!)
2. Food photography in a controlled setting. When I am at home, in my kitchen, I love to cook. I started NutritionallyYours to share some of my insights while studying nutrition, but have found it tends to focus more on food and recipes…hence the need for food photography.

So….here are the Food Photography 101 tips I have put together for Food Photography in a Controlled Setting.
Lighting
Like driving a car, if you are going to light up your food, the best placement is 10 and 2! Keep the light soft where possible to avoid harsh shadows and distorted lines in your food. Some say natural light from a window will cast the best light on your food. Others recommend a light box to diffuse the light. My home setup is pretty simple. To date, I have been using a high ISO to compensate for the lack of light in my kitchen. A simple desk lamp has also saved the day on a few occasions.
Composition Basics
Crop, crop, crop (music to my ears) where appropriate. You want the food to be the focus, not the clutter on the counter top. You also don’t want a huge expanse of nothing behind your dish. A tight crop will bring focus to your food, simplifying the shot so that the food literally jumps off the photo. Crop with the lens by getting in close. Getting in close will also highlight the texture of the food. Let’s get up and personal.

Foreground the food – make it front and centre in the shot. Food photography is about making the food the subject. Make it stand out by giving it the prime position in your viewfinder.
If cropping is not the answer as you want context…use Depth of Field to your benefit. Perhaps you are setting up the shot for a picnic dish – why not photograph that dish on a picnic table so the context of the use of the food is evident in the photo.
While I have yet to master this technique…I love it when I come across photos of a serving of the food in question in focus in the front of the shot with the remained of the dish in the background, gently out of focus and basically, out of range. Works brilliantly with pies, quiches, pizzas etc…. Anything that has been created as a dish with a piece taken from it!
Angle
Shoot from a lower angle – it will better highlight the food, giving depth and volume to the photo. Fork view will keep it interesting. Some say to shoot at a 45 degree angle.
Staging or Food Styling
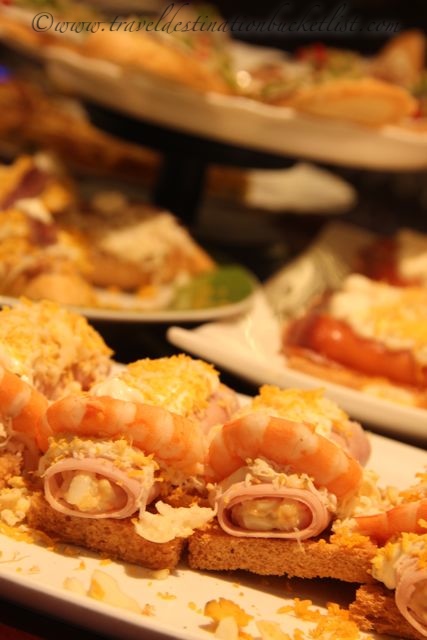
Real estate agents do it with houses all the time. Professional photographers are no different – check out some high end food photos – everything has a purpose in that photo and is meant to create an image, sell a product or stimulate you to cook that recipe… Remove the clutter from the background, use props where appropriate and add context where needed. On my post from the food experience from La Muralla, one of the comments I got was in regards to the size of the hand made ravioli. With no reference point, it was hard to tell how big the ravioli was. Lesson learned – I will look at adding a fork in the future to give the context of size!

Oil – while I have yet to try this, a number of sites recommended a small amount of vegetable oil may be used to enhance the photo. It’s like photo shop before the photo is even taken! Just be careful – it is possible to over oil your food, giving it a greasy appearance. That most likely won’t be too appetizing!
Clean up – they do it in the best of restaurants…and you should too! Before shooting the food, take a cloth and wipe the plate, eliminating any crumbs, sauce smudges or marks on the plate that don’t belong on your photo.
Action
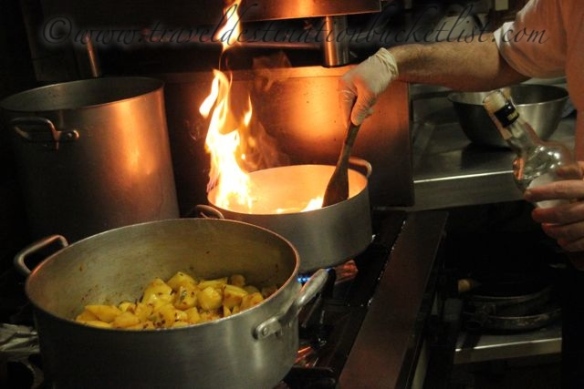
I never would have even thought of this, but it is true…action brings a dynamic element to a photograph, whether it is food photography or otherwise. Use a tripod to get a slower shutter speed to capture the motion. Take the shot just as the food comes out of the oven and you have the steam rising up – makes it more appetizing and places the viewer in the shot. How about garlic sizzling in a hot pan of oil?? One of the shots I took while in the kitchen at San Sebastian Food’s cooking class was the classic flames with the gas stovetop – while it wasn’t a perfect shot – I still love it!
Colour
No one wants a dull and unappetizing dish…make sure the colours pop in your shot. Crazy plates with colourful designs may distract from your food, but out of focus background colour should lend a warmer feel to the photograph. Carefully chosen background colours can really make your food pop. Have a little fun with it – try different props to add colour – a pretty napkin or place mat my be all you need.
Equipment
Any camera will do. Point and shoots these days even have a food setting for taking photos of your dinner. You see people pulling these out in restaurants all the time! Phones aren’t just for talking anymore either….it is amazing how things have changed with the camera quality smart phones out there. While some photography tips suggest a macro, I have found the 50 mm fixed to be great to work with. It always for such a narrow depth of field, yet isn’t too powerful a lens. I find my 100 mm macro to be a brilliant lens, but sometimes a little too much for my crop happy ways and limited kitchen space! I have a tendency to use my favourite “all-in-one” travel lens – the 18 – 200 mm. My kitchen isn’t that big and the range of focal lengths can’t be beat when I use that one! If you are looking at light boxes and off camera flash photography, you are already well above my skill set! Perhaps you would like to write a more technical post for me – but my skills and equipment are not there yet!
I do see the benefits of using a tripod and will most likely be giving that a go for some fun action shots.
I have a long way to go in my food photography skills – but these are some of the top Food Photography Tips links I found on my internet search:

